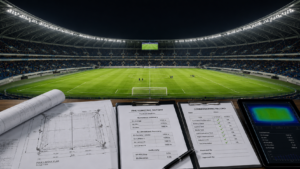
EN 12193 is often referenced in European sports lighting tenders-but many projects still struggle to translate it into a design workflow, a measurement plan, and a clean sign-off. This guide turns the standard into a project-ready checklist.
Most “failures” happen when simulation assumptions don’t match on-site aiming and measurement-so your workflow must include commissioning steps from day one.
- Key takeaway #1: Pick the class first (training vs competition vs broadcast), then design to the class metrics-not the other way around.
- Key takeaway #2: “Average lux” is not enough-Uniformity and GR glare often decide acceptance.
- Key takeaway #3: Lock the measurement grid and assumptions early, so the commissioning team measures the same “project reality” you simulated.
Table of contents
When this applies
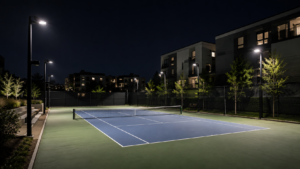
Use this guide when your sports lighting project is in Europe (or references European practice) and the tender mentions EN 12193 - especially for football pitches, multi-sport complexes, training grounds, and municipal venues.
Typical project scenarios
- New builds: You need a clean standard baseline to define performance + acceptance.
- Retrofits: You must prove you can meet the required class without rebuilding poles, cabling, or structures.
- Community-adjacent venues: You must balance class metrics with glare/spill (obtrusive light) limitations.
- Consultant-led tenders: You need a calculation report with explicit measurement rules and sign-off steps.
Key requirements / metrics
Below is a practical “what matters” table. Exact numeric targets vary by sport and class-always confirm the sport table and local tender notes. The goal here is to make your spec measurable and your site test repeatable.
| Metric | What it means | Why it affects acceptance | Typical targets (range) |
|---|---|---|---|
| Maintained illuminance Ēm |
Average illuminance after applying maintenance factor (MF). | Ensures the field stays compliant over time (not just on day-1). | Training often sits lower; competition higher; broadcast projects may require higher values and additional vertical criteria. |
| Uniformity Uo |
Usually expressed as Emin / Eavg (or related uniformity definitions). | Low uniformity creates dark patches, affects play and camera quality. | Typically increases with class (higher class → stricter uniformity). |
| Glare rating GR |
Outdoor glare indicator used in sports lighting assessment. | Glare is a common reason for “acceptable lux but rejected venue.” | Often specified as a maximum GR limit (depends on class/sport and tender). |
| Color rendering Ra/CRI |
How accurately colors are reproduced. | Impacts perception, safety, and broadcast visual quality. | Basic projects accept moderate CRI; professional venues prefer higher CRI. |
| Correlated color temperature CCT |
The “white tone” (e.g., neutral vs cool). | Influences comfort, visibility, and broadcast look. | Common practice favors neutral-cool white; exact choice depends on venue preference and camera needs. |
| Flicker metrics PstLM/SVM |
Quantitative flicker indicators (especially for broadcast & high-speed video). | Prevents banding/rolling lines on camera and visual discomfort. | Often required in broadcast tenders; define measurable targets & test method. |
| Spill / obtrusive light | Light escaping to neighbors/roads/sky. | Drives complaints, curfew requirements, and local approvals. | Site-dependent: define sensitive points and limits in the spec and report. |
Definitions
Maintained illuminance accounts for lumen depreciation and dirt depreciation using a maintenance factor (MF). Uniformity describes how evenly light is distributed. GR addresses perceived glare in outdoor sports lighting.
Typical target ranges
A safe way to communicate “typical ranges” (without misquoting sport tables) is to use project categories: Training → Competition → Broadcast / Elite. Then confirm the exact numeric targets from the tender and sport table.
Step-by-step workflow
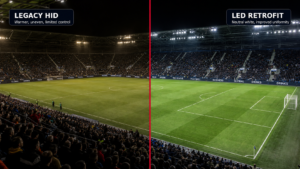
This workflow is designed to prevent the most common failure mode: “the simulation passed, but the site test failed.” The key is to treat commissioning as part of design-not a last-minute activity.
Inputs to collect (must-have)
- Sport + competition level: which class is required (and whether broadcast is included).
- Field geometry: dimensions, orientation, and any restricted zones.
- Pole data: pole positions, mounting heights, outreach arms, maximum tilt limits.
- Electrical: available power, existing cabinets, control wiring feasibility (DALI/DMX/0-10V).
- Site constraints: nearby roads, houses, airports, or curfew requirements (spill/glare).
- Acceptance method: measurement grid/area definition, instrument requirements, and sign-off responsibilities.
Design decisions (key points)
- Choose class & acceptance grid first. This sets your measurable target and avoids later disputes.
- Select photometrics intentionally. Use optics that match pole heights and minimize glare/spill, not just “wide/narrow.”
- Simulate with realistic MF and aiming. Lock mounting height, tilt, and aiming angles early.
- Add spill/glare constraints. If neighbors exist, treat spill limits like a “hard requirement.”
- Generate an aiming table. Commissioning teams need a practical aiming document, not only a report.
Verification & sign-off (how to pass commissioning)
- Pre-commissioning check: verify actual mounting height, tilt, and fixture orientation match the design model.
- Aiming: use the aiming table + on-site reference points; lock angles after verification.
- Measurement: measure using the pre-agreed grid/area, and record conditions (weather, time, surface reflectance notes).
- Report package: provide measurement results, photos, aiming records, and the full document pack for sign-off.
Common mistakes (and how to avoid them)
- Starting with wattage instead of class: the project must be driven by class metrics, not fixture power.
- Uncontrolled assumptions: mounting height, tilt, MF, and aiming must match between simulation and site.
- Wrong measurement grid: changing the grid at commissioning makes results incomparable and disputes inevitable.
- Ignoring spill constraints: neighbor/road sensitivity must be treated as a design requirement-not a post-fix.
- No aiming table: installers need a simple aiming document to reproduce the simulated result.
- “Lux only” acceptance: projects can fail due to glare and uniformity even with high average lux.
Quick fix: a 5-minute pre-install alignment check
Checklist / Template download
EN 12193 Spec Clause Pack (TXT)
Copy-paste tender language: class, metrics, measurement rules, sign-off scope.
Measurement Grid + Sign-off Checklist (CSV)
Commissioning plan to align simulation assumptions with on-site testing.
Aiming Table Template (CSV)
Installer-friendly table: pole ID, fixture count, optics, tilt, aiming notes.
Inputs to Collect (TXT)
A fast site-survey checklist your sales/PM team can reuse daily.
Request the full pack
On your website, connect this form to your CRM / email automation. This is a preview layout for your team.
Privacy: we use your details only for document delivery and technical follow-up about this request.
FAQ
Is EN 12193 the same as FIFA/UEFA standards?
EN 12193 defines lighting classes, metrics, and measurement rules. FIFA/UEFA requirements may add sport-specific or broadcast criteria (often vertical illuminance and camera-related considerations). Many projects use EN 12193 as a baseline, then layer federation rules on top.
What is the biggest reason projects fail on-site even if the simulation passed?
Most failures come from mismatched assumptions (mounting height, aiming angles, maintenance factor), different measurement grids/areas at commissioning, and insufficient spill/glare control for the real site constraints.
Do I need Class I lighting for a training field?
Usually no. Training fields typically target a lower class than professional competition venues. Choose the class first based on the sport, level of play, and whether broadcast is required—then design to the associated metrics.
Which metrics matter most besides average lux?
Uniformity and glare (GR) are frequent acceptance drivers. Spill/obtrusive light can also be decisive for community-adjacent sites. For broadcast, add vertical illuminance and flicker metrics.
What should be included in a tender-ready specification?
Include: sport + class, maintained illuminance, uniformity, glare limits, measurement grid rules, photometric report format, commissioning/sign-off procedure, and the required document pack (IES/LDT, datasheet, wiring, and test reports).