On-site problems are rarely ‘bad luck.’ They are usually missing steps, unclear roles, and untested workflows. This guide shows a repeatable process for reducing risks during installation, commissioning, and demonstrations-useful for trade shows and real stadium projects alike.
On this page
- Why on-site risks happen
- The 5-stage workflow: install → power-on → control → demo → backup
- Stage 1: Installation controls (brackets, aiming, safety)
- Stage 2: Power-on controls (wiring, labeling, verification)
- Stage 3: Control readiness (SOP, scenes, permissions)
- Stage 4: Demo readiness (timing, messaging, operator training)
- Stage 5: Backup planning (spares, reset logic, contingency)
- A downloadable checklist structure you can reuse
- How to apply this process to OEM/ODM projects
Why on-site risks happen
Stadium lighting delivery involves multiple moving parts: mechanical installation, electrical work, aiming/commissioning, and often a control layer. Most failures are not technical mysteries. They are execution gaps:
- Unclear installation sequence (people improvise)
- Labeling and wiring confusion (wrong ports, wrong groups)
- Control steps not rehearsed (demo breaks under pressure)
- No reset/backup plan (small issue becomes a major delay)
The solution is not “work harder on-site.” The solution is to move risk upstream: test steps, document SOPs, train roles, and build a repeatable workflow.
The 5-stage workflow: install → power-on → control → demo → backup
We use a simple five-stage framework. It keeps the team aligned and reduces surprises. You can apply it to a trade show build, a pilot installation, or a full stadium delivery.
The 5-Stage Workflow
- 1) Installation – brackets, aiming marks, fastening, safety
- 2) Power-on – wiring verification, labeling, protective checks
- 3) Control – SOP steps, grouping, scenes, permissions
- 4) Demo – stability check, timing, operator training, messaging
- 5) Backup – spare parts, reset logic, quick fixes, contingency time
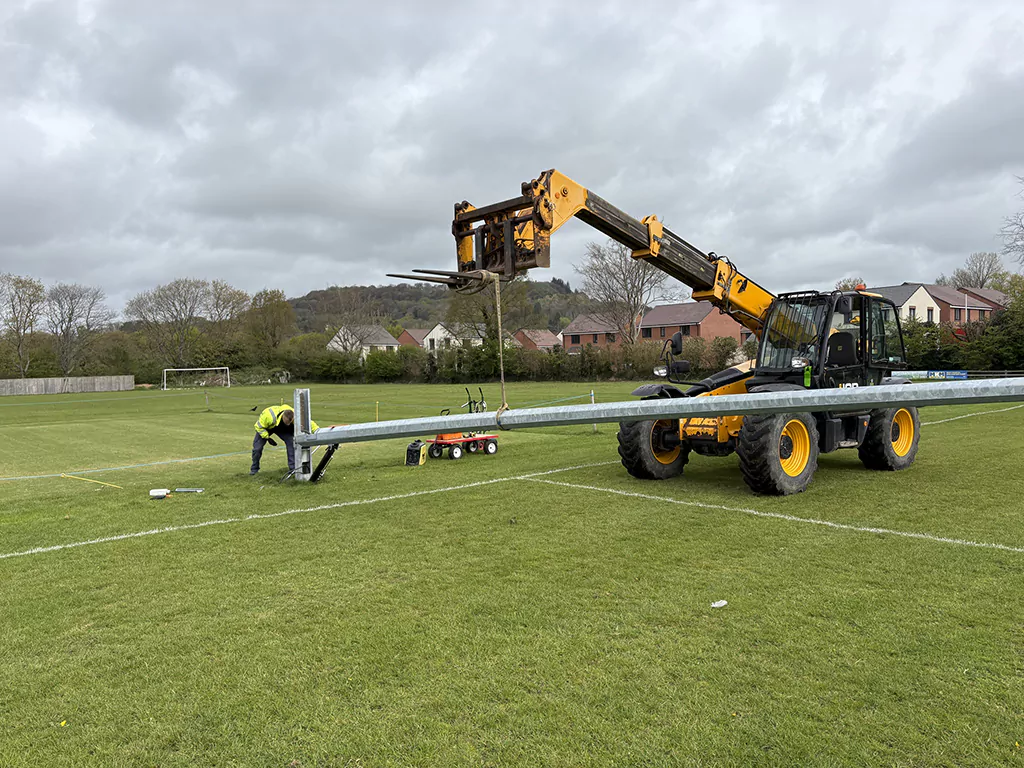
Stage 1: Installation controls (brackets, aiming, safety)
Mechanical installation is often the first risk layer. If brackets are not assembled consistently, aiming becomes unreliable and safety is compromised. Best practices include:
- Sequence discipline: fix anchor points → align bracket → torque check → secondary locking
- Aiming marks: define angle reference points so different installers achieve the same result
- Safety checks: verify locking parts, anti-loosening measures, and load path assumptions
For modular systems (e.g., modular stadium floodlights), installation should also consider service access: space for maintenance, cable routes that won’t strain connectors, and clear visibility for inspection points.
Stage 2: Power-on controls (wiring, labeling, verification)
Power-on issues are usually avoidable. They come from wiring ambiguity and missing verification steps. A clean power-on stage includes:
- Labeling standard: every cable and connector is labeled consistently (group / channel / location)
- Verification: continuity checks and polarity confirmation before first power
- Protection review: ensure grounding, surge protection assumptions, and IP sealing checks are aligned
If your project includes control lines or network connections, treat them as a separate discipline: don’t mix labeling logic, and don’t let control wiring become “afterthought cabling.”
Stage 3: Control readiness (SOP, scenes, permissions)
Controls should never be demonstrated without a written SOP. Even simple systems need a sequence: which groups are active, what scenes exist, how to dim, and how to reset. A practical control readiness checklist includes:
- Grouping: confirm group naming matches physical zones
- Scenes: keep scenes minimal and meaningful (training / match / maintenance / atmosphere if applicable)
- Permissions: define who can change scenes vs who can only run predefined modes
- Reset logic: what happens if the system reboots or a device disconnects
For projects involving RGBW, readiness must include a clear narrative: RGBW is an application choice, not an automatic “upgrade.”
Stage 4: Demo readiness (timing, messaging, operator training)
A demo is an operational deliverable. It should be timed, rehearsed, and repeatable. The highest-risk demo is the one that depends on one person’s memory. We therefore:
- Time the full demo sequence (start → key scenes → reset)
- Train at least two operators to run it independently
- Prepare a “short demo” version for busy moments
- Prepare a “deep demo” version for technical visitors
Messaging matters too: visitors should understand what they are seeing and why it matters for ROI, safety, and venue experience.
Stage 5: Backup planning (spares, reset logic, contingency)
Backup is not pessimism-it is professional planning. Even small items can save hours: spare fasteners, backup cables, replacement connectors, a labeled toolkit, and a printed reset procedure.
Backup Planning Essentials
- Spare parts: connectors, fasteners, key bracket components
- Spare cables: power and control lines, pre-labeled
- Reset SOP: step-by-step restore procedure
- Quick-fix kit: tools, ties, labels, sealing items
- Contingency time: build a time buffer into the schedule
A downloadable checklist structure you can reuse
If you want to turn this into a reusable asset, format it as a one-page checklist. This can also become a downloadable PDF for your customers-highly shareable and SEO-friendly.
How to apply this process to OEM/ODM projects
OEM/ODM projects benefit from the same discipline. A good factory partner does not only provide hardware; they support a repeatable delivery process: documentation, training, packaging logic, and control workflows.
- Documentation: installation & commissioning SOPs
- Consistency: labeled harnesses, repeatable packing logic, clear interfaces
- Support: engineering feedback loops and pre-shipment validation
Related reading: OEM/ODM Engineering Collaboration • Frankfurt Booth Rehearsal
FAQ
What is the fastest way to reduce on-site errors?
Use a written SOP and a labeling standard, then train at least two operators. Most errors come from ambiguity and single-person dependency.
Should small training fields use the same process?
Scaled-down, yes. Even small projects benefit from clear grouping, basic dimming strategy, and a reset plan.
How do controls affect on-site risk?
Controls add a layer of coordination. Without a scene list, group naming, and a reset workflow, control issues become the most common on-site delay.
Want the checklist as a one-page PDF for your team or customers?
We can format this workflow into a downloadable checklist and tailor it to your project type (training fields, stadiums, arenas, or multi-purpose venues).