
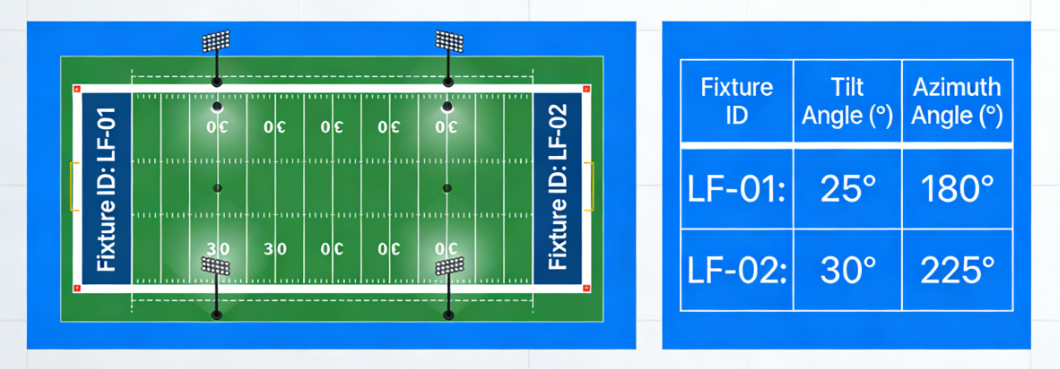
 Stop losing time in ‘aim again’ loops. Use a structured aiming table (tilt/azimuth per fixture), record as-built angles, and verify with a repeatable sign-off workflow.Answer: Use a fixture ID plan + aiming table (tilt/azimuth) to make aiming repeatable. Record as-built angles and deviation reasons so commissioning is auditable.
lass=”yoast-text-mark” />>Verify performance with a defined on-site grid and sign-off checklist—then lock the as-built pack for lifecycle maintenance.
- Key takeaway #1: Aiming without IDs creates rework; IDs + references make errors fixable fast.
- Key takeaway #2: Record as-built tilt/azimuth and deviation reasons to prevent disputes.
- Key takeaway #3: Add a re-check plan after settling to reduce long-term re-aiming cost.
<h2>Table of contents1) When this applies
2) Key requirements / metrics
3) Step-by-step workflow
4) Common mistakes
5) Checklist / Template download
6) FAQ
Related reads:
• Acceptance criteria
• Engineering validation
• Ins
tallation step-by-step guide
</article>
- New installations: repeatable aiming across teams.
- Retrofits on existing poles: offsets and legacy headframes increase errors.
- Broadcast venues: small aiming drift can fail uniformity.
- Multi-scene controls: match/training scenes rely on consistent aiming.
Key requirements / metrics
Use this metrics table as a definition of what “good aiming documentation” means at sign-off.
| Aiming element | What it controls | Why it matters | How to document |
|---|---|---|---|
| Fixture ID & location | Traceability. | Without IDs, errors can’t be corrected efficiently. | Unique ID per fixture + pole position + photo reference. |
| Tilt angle | Main beam direction. | Controls glare and peak intensity landing. | Design tilt + as-built tilt recorded. |
| Azimuth angle | Left-right aiming. | Critical for width uniformity. | Reference direction + as-built azimuth. |
| Aiming reference | Repeatability. | Crews interpret “aim to center” differently. | Define aiming point reference on plan. |
| Deviation notes | Change control. | Explains differences and prevents disputes. | Record reason + approval + actions. |
Definitions
An aiming table assigns each luminaire a unique ID and defines its design tilt and design azimuth, plus an as-built record to make commissioning auditable.
Aiming without IDs is like wiring without circuit numbers.
Typical target ranges
Good aiming packages share the same intent:
- Consistent references: one azimuth reference across the site.
- As-built recording: every fixture gets an as-built angle and photo ref.
- Re-check plan: one follow-up inspection after settling.
Step-by-step workflow
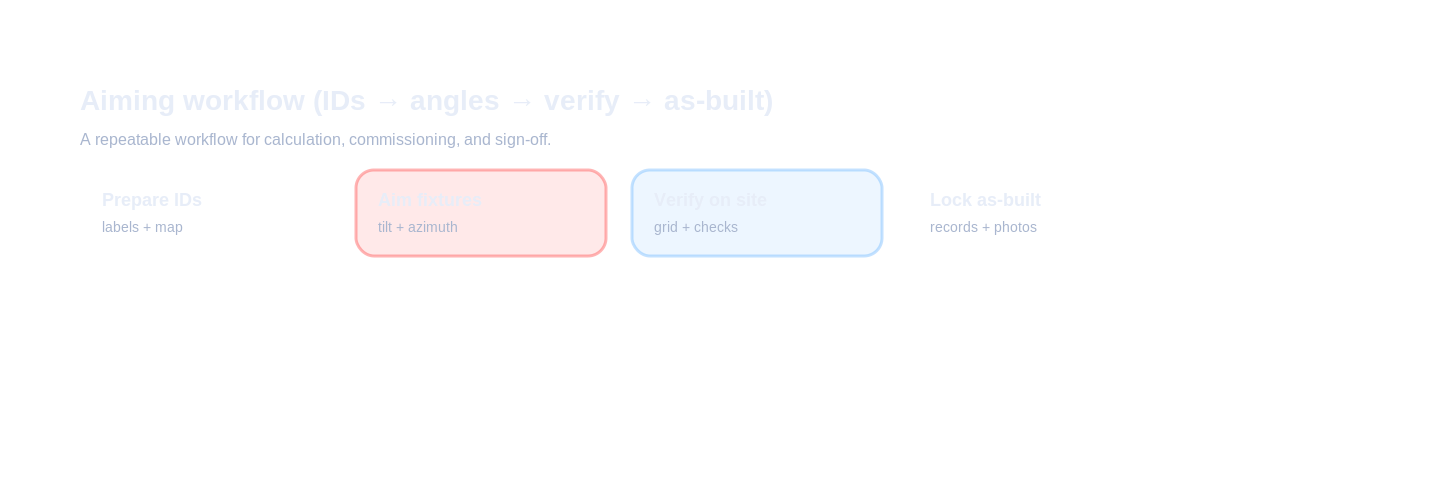
Commission aiming by workflow: prepare aiming table → label fixtures → aim by reference → verify on field → lock as-built records.
Inputs to collect
- Pole layout & heights: as-built coordinates and mounting heights.
- Fixture ID plan: ID scheme and label method.
- Design angles: tilt/azimuth and aiming points.
- Verification plan: measurement grid and acceptance criteria.
Design decisions
- Define azimuth reference.
- Lock fixture ID scheme.
- Define aiming points.
- Define re-check rhythm.
Verification & sign-off
- As-built aiming table delivered.
- Photo evidence.
- Sign-off checklist.
Common mistakes
- No fixture IDs.
- Unclear azimuth reference.
- No as-built recording.
- Ignoring bracket offsets.
- No re-check plan.
Checklist / Template download
Aiming Table (CSV)
Tilt & azimuth template with as-built columns.
lass=”yoast-text-mark” />>Download
Request full pack
Fixture Labeling Plan (TXT)
Prevent confusion across crews and shifts.
>Download
Request full pack
As-built Aiming Log (CSV)
Record method, deviations, and approvals.
>Download
Request full pack
Tender Clause (TXT)
Tender-ready aiming & evidence requirements.
>Download
Request full pack
Request the full pack
On your website, connect this form to your CRM / email automation. This is a preview layout for your team.
Privacy: we use your details only for document delivery and technical follow-up about this request.
FAQ
What is the fastest way to commission stadium floodlights without endless re-aiming?
Use a structured aiming table (tilt/azimuth per fixture), record as-built angles, and verify against a defined on-site grid and sign-off checklist.
What should an aiming table include?
Fixture IDs, mounting height, design tilt/azimuth, aiming point reference, and an as-built column for deviations.
Do I need a theodolite or laser for aiming?
Not always. Use the method that matches accuracy needs, but document the method
and record as-built angles.
Why do ‘same a
ngles’ still look different?Because pole height, bracket offsets, and fixture rotation differences accumulate—IDs and r
eferences prevent confusion.
What belongs in an aiming sign-off pack?
Aiming table, as-built photos, deviation notes, and a re-check plan after settling.
Ready to move from “requirements” to a passable design?
Get a calculation report + IES/LDT + tender-ready clauses (plus aiming table).
Get the PackBack to ZCLED.com

 English
  한국어
한국어  Español
  简体中文
简体中文  Français
  Deutsch
  العربية
  日本語
日本語